Saturday, August 27, 2016

Cherish

Hello friends...here is my last layout 


I made for beautiful mood board from Dusty Attic


I love the colour pallete and the woodgrain , I  inspired to make something beautiful for a friend when I visited them a week ago, and  hopefully they like .


I used a chipboard from Word Pack #4 DA 10777Z  , I blend a medium paste with a texture paste and covered for the chippie and then I sprayed a little bit with LSG mist  and add embossing powder
 from LSG and then I heat with a heat gun until some bubble appear.


I have also use a Flutterbies #2 DA0713 on the corner of paper flowers from I am Roses,
 heart dies out from Sizzix , leaves also dies out from Joy craft and 
a vintage clock I fuzzy cut from a Kaisercraft paper.

Thanks for stopping by,


Hugs
Irma Tirza

Saturday, July 30, 2016

My Rapunzel Tower

Hello friends... this is is my last creation after long time break. I made a Rapunzel Tower as a gift for my little niece. Hope you like it too as she likes.. I altered a Tower from  Pringles can


I entered my work to :

Thankyou for stopping by,


Hugs,
Irma Tirza

Thursday, June 23, 2016

Proud of you - Baby Frame

Helloo everyone..this is my last post for Lulupu.. Time flies so fast ..still remember when I got a message from Karuna to give me a chance to be a part of her beautiful blog, as you know its only me as an International DT. Thank you so much Karuna for trusting me although is the first time for me to working as a team abroad, so much experience and learning from others DT here.... I will miss you so this moment.

This month our theme 
Challange #62 is 
Twinkle Twinkle Little Stars - Celebrating Baby


The Rules for Challenge are :
1. Anything goes - cards, scrapbook layout, album, tags, ets
2. Must be baby theme
3. Must have STARS in your project

Please read the general guidelines for the challenge HERE :)


Now here is my project , I made a baby boy frame, hope you like it.


a little pictorial etc

  
first I made a pattern from Dutch Doobadoo stencil for a frame shappe ,  I made on a yellow board as a modult and duplicate with pattern paper .


then I cut 6 .5 " x 4.5" a yellow board for the photo place.


For standing frame I made from sizzix dies out, 

I use embosing powder for the stars , with gold colour

After I finish all my chippie with embosing powder I decorate my frame

Long time I am not coloring my image stamp from Magno , so I decide to add this image for embellishment.


here is some closer


All supplies  I use are:
Gesso, Modelling Paste, Texture Paste, Ink spray , you can find at store here


Hope it inspired you, and last I will share  my favorite project from my DT term . Let's checked out ..


This is a canvas No Place Like Home, I made a home decor using a lot of  inka Gold  you will find step by step a pictorial Here


 This is my first poject at Lulupu, a cover book with washi tape , you can see the detail here


This is my layout Ups...you will find the detail here


Hope all make inspiration for you,,,time to say good bye..and please don't hesitate to contact me if you want to ask.

And don't forget to submit your work  here can't wait to see your beautiful work.


Thank you so much for stopping by,

with hugs xx


Irma Tirza

Friday, May 13, 2016

Dream Big Art Journal - Pictorial

Hello everyone... how are you ? This month Lulupu challenge#61 is Mini Album, you can made any style and shape but the final project must look like a booklet ..for any detail you can find the rule and submit your project here

For this time I would like to share with my 'Dream Big' Art journal mixmedia, I made with pictorial to hopefully will inspired you.


Here are the step by step a pictorial...let's started and enjoy !

Step 1

First glued an Alpha chipboard on your journal book


Step 2


 Cover with a heavy Gesso

Step 3

separation the upper layer from paper tissue

Step 4

tear off a paper tissue and glued randomly on your journal

 Step 5

 Cover again with a white heavy gesso

Step 6

 I add  ink spray from the edge and spray with  a little water

Step 7

 Do the same to another page

Step 8


 Dried with a heat gun

Step 9

 Stamp randomly with some of various stamps

Step 10

Colour a chipboard with inkagold

Step 11

I use a stencil and inka gold to make some layer 

Step 12

 Take a piece of white cardstock and glued a paper tissue .  

Step 13

 I used a butterfly stamp from Kaisercraft

Step 14

 Stamp on the paper tissue 

Step 15

Fuzzy  cut the stamp of butterfly image and glued on the journal

Step 16

 Make a line border with a sharpie pen..

Step 17

The least but not last I add  splash with ink spray colour red to give it bright

Step 18

and the final touch I added some sequins...you can see on my simple video below


All the medium you can find at the Lulupu Store ,  and you can find the substitute medium here
Supplies :

Hope you all like and clear with my pictorial. Please don't hesitate to contact me if you need any question. 
Thank you for stopping by , and don't forget to stay a long with our this month challenge.
Can't wait to see your work and good luck.


Big Hugs,
Irma Tirza


Friday, April 15, 2016

Ups ! Cheerful LO for LULUPU DT Post Challenge #60

Hello everyone, Irma here,,,nice to meet you all.
Today I'm sharing my cheerfull LO with the awesome Moodboard create by Lulupu 

let's see what I create inspired from the Mood Board..
This is my LO I create  for you with a stamping, spraying and colouring tehnique.


I use a photo from my beautiful niece, she is also a talented girl in painting and crafting.
The mood board our create this month is colorful and suitable for her typical , she is cheerful ..right ?LOL

more closer for my background

first I coat using medium gloss  and light white gesso to covered the pattern paper and then I glued some doiley paper to make a texture. After that I spray with a little water and add a little bit of Magical Powder from LSG product and blend with my finger .


 After I spraying the background I using a circle stencil with black gesso and then I use my flower stamp , Butterfly stamp and Dot Stamp randomly.


After that I coloured my circle stamp with H20 and Glimmer Glaze , you can see the photo below . the yellow circle I coloured with Glimmer Glaze


Ups ! I forgot to take a picture closer a chippboard which I used behind my niece photo. But I can tell you the chipboard I covered with crackle paste before I paint with Glimmer Glaze.
A final touch I decorated my page with a paper flowers and sequins .

I inspired the colours and happily moment from the photo our mood board , so don't forget to mention your post how  the Mod Board has inspired you....


Challenge #60

To play along Challenge#60 , you have to :

  • Create any project - Card, LO, Mix Media, Home Decor, Altered Art, 3D Projects etc.
  • Your project must be inspired by the Mood Board. The Mood Board can be interpreted in various ways like the colour, shapes, texture, techniques, material etc.
  • Last day for submission is 30th April, 2016 11;55 PM IST

General rules applicable for all challenges can be read here and post your work here

You have enough time to play with us..and I would love to seeing what your create inspiring by our Moodboard and Good  Luck 

A crafty hugs from me

Irma Tirza


Wednesday, March 16, 2016

NO Place Like HOME - Challenge #59 / Pictorial


Hello friends... Irma here , I'am so glad to meet you again. This month our team is very Happy because this is our special month ! LULUPU is turns 4 so what a surprise for you.... xoxoxo:)

To celebrate our Birhtday we have so many many prizes for you !!

First  : a super Bumper Raffle  worth Rs 15000 worth from Prima Marketing to be won...so what you have to do..., you will join in raffle  here...

Second : Lulupu Bithday Crossword Puzzle !! one Lucky winner will receive a gorgeous package of goodies!  How to Play ?? lets see here


but wait.... we still have another game to celebrating our birthday with a Grid Birthday Challenge
lets see what our team make a create wonderful Birthday Grid for all of you to play along with us!

so this is our month Challenge !

Birthday Grid #59


Rules of this month Challenge is  create a card or Layout  on a Birthday Theme , and 2 (two ) prizes for the winner in each category , for complete information , please visit here

So guys....what I create for this special time....

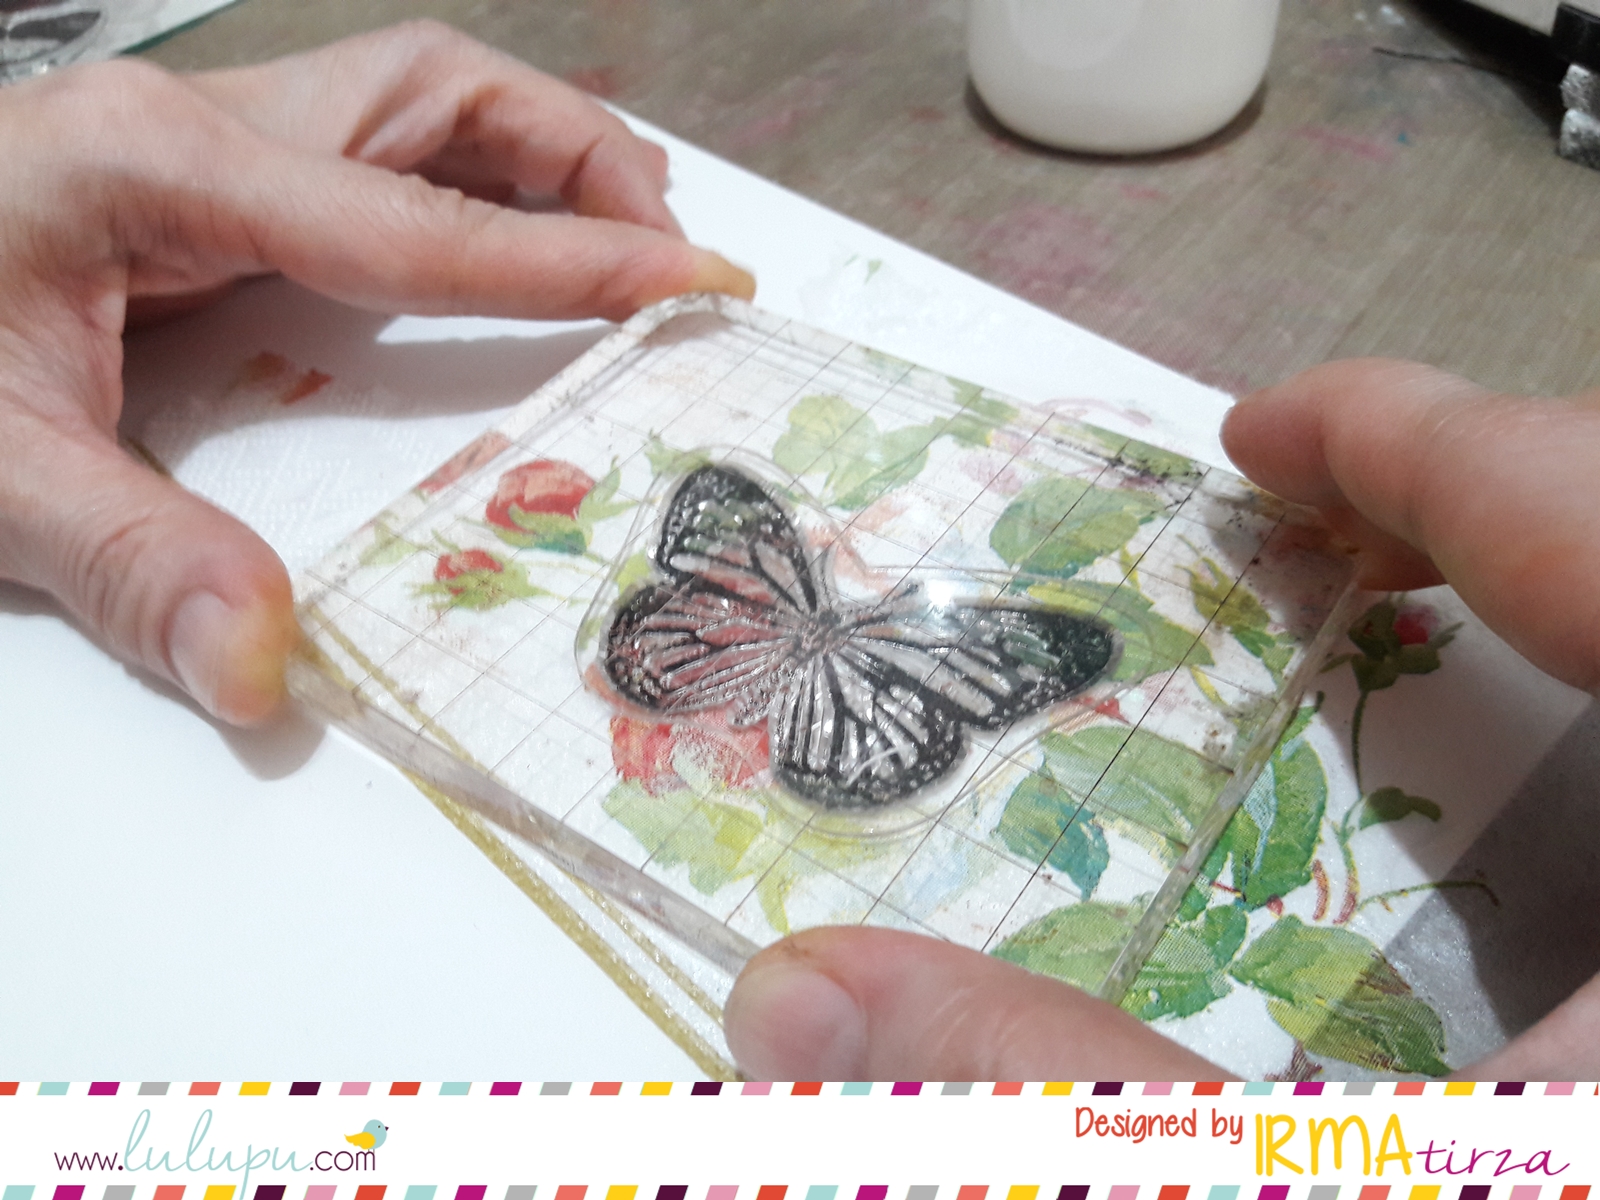
I make a home decor with a double canvas  , and a complete pictorial step by step so i hope it will help you to create like this . : )

here is the photo


and look a step by step below 
 I prepared 2 (two) canvases size 20 cm x 30cm and 15cm x15cm


make a line where you want to add the small canvass on top


Paint around with black gesso  , do the same with a small canvas on back  


make a briks with modelling paste and a stencil


do the same as the previous one


combine a small canvas at the top on another  bigger canvaas with
 a hot glue gun and sprayed with ink .


I use a mica powder at the edge and sprayed with a little water  


inside the small canvas I cover with Texture paste

 and add a cheese cloth as embellishment


I print my journaling and coloured with distrees ink  ( evergreen bough )


after that I distress my journaling with distress tool and cut word by word

with a black sharpie pen I line around the edge 


I colored  my title with inka gold, Copper Color


I colored  the chippie bird cage with inka gold, Gold Color


and I colored my resin with perfect pearls

also a charm and the door I coloured with Inka Gold, Ice Blue color


after I finished colored all embellishment, I decor those on my canvas 


after I fix all things in the right composition I repaint again with inka gold


I thought I missed something to used ...yes a texture paste ! so I add a few  at the corner and some place to give more texture 


After I add a few of texture paste, I color with inka gold, Turquiz Gold


here is some closer


That's all from me, I hope  I've inspired you to try out make something different
All the product I used , you will find at Lulupu Craft Store

There is still much time to submit your wonderful project and we can't wait to see your work!

Have a great days, Happy crafting !

Hugs,
Irma Tirza